第13章 IO流
第13章、IO流
目录
- 一、File 类的使用
- 二、IO 流原理及流的分类
- 三、节点流 (或文件流)
- 四、缓冲流 (处理流的一种)
- 五、转换流(处理流的一种)
- 六、标准输入、输出流 (了解)
- 七、打印流 (了解)
- 八、数据流 (了解)
- 九、对象流 (掌握)
- 十、随机存取文件流 (了解)
- 十一、NIO.2 中 Path、Paths、 Files 类的使用 (了解)
- 补充(第三方 API jar 包导入)
- 每日一考
IO: Input、Output;输入:磁盘 --> 内存;输出:内存 --> 磁盘
一、File类的使用
File类的对象可充当文件或文件夹,用以使用java中的对象表示磁盘存储的端点。
File类声明在java.io包下
- java.io.File类:文件和文件目录路径的抽象表示形式,与平台无关 File 能新建、删除、重命名文件和目录,但 File 不能访问文件内容本身。如果需要访问文件内容本身,则需要使用输入/输出流。
- 想要在Java程序中表示一个真实存在的文件或目录,那么必须有一个File对象,但是Java程序中的一个File对象,可能没有一个真实存在的文件或目录。
- File对象可以作为参数传递给流的构造器
(一)、常用构造器
第一种
1
public File(String pathname)
- 以pathname为路径创建File对象,可以是绝对路径或者相对路径,如果pathname是相对路径,则默认的当前路径在系统属性user.dir中存储。
- 绝对路径:是一个固定的路径,从盘符开始
- 相对路径:是相对于某个位置开始
- 路径中的每级目录之间用一个路径分隔符隔开。
- 路径分隔符和系统有关:
- windows和DOS系统默认使用“”来表示
- UNIX和URL使用“/”来表示
- Java程序支持跨平台运行,因此路径分隔符要慎用。
- 为了解决这个隐患,File类提供了一个常量: public static final String separator。根据操作系统,动态的提供分隔符。
- 以pathname为路径创建File对象,可以是绝对路径或者相对路径,如果pathname是相对路径,则默认的当前路径在系统属性user.dir中存储。
第二种
1
public File(String parent,String child)
以parent为父路径,child为子路径创建File对象。
第三种
1
public File(File parent,String child)
根据一个父File对象和子文件路径创建File对象
(二)、File类常用方法
File类的获取功能
1
2
3
4
5
6
7
8
9
10
public String getAbsolutePath() //获取绝对路径
public String getPath() //获取路径
public String getName() //获取名称
public String getParent()//获取上层文件目录路径。若无,返回null
public long length() //获取文件长度(即:字节数)。不能获取目录的长度。
public long lastModified() //获取最后一次的修改时间,毫秒值
// 如下方法适用于目录
public String[] list() //获取指定目录下的所有文件或者文件目录的名称数组
public File[] listFiles() //获取指定目录下的所有文件或者文件目录的File数组File类的重命名功能
1
public boolean renameTo(File dest)//把文件重命名为指定的文件路径
要想保证重命名成功,需要调用者存在于硬盘中、且dest不能存在于磁盘中
File类的判断功能
1
2
3
4
5
6
7
8
public boolean isDirectory()//判断是否是文件目录
public boolean isFile() //判断是否是文件
public boolean exists() //判断是否存在
public boolean canRead()//判断是否可读
public boolean canWrite()//判断是否可写
public boolean isHidden() //判断是否隐藏
// 可先判断文件是否存在 exists(),在进行后续操作File类的创建功能
1
2
3
public boolean createNewFile() //创建文件。若文件存在,则不创建,返回false
public boolean mkdir() //创建文件目录。如果此文件目录存在,就不创建了。如果此文件目录的上层目录不存在,也不创建。
public boolean mkdirs() //创建文件目录。如果上层文件目录不存在,一并创建注意事项:如果你创建文件或者文件目录没有写盘符路径,那么,默认在项目路径下。
File类的删除功能
1
public boolean delete()//删除文件或者文件夹
删除注意事项:
- Java中的删除不走回收站。
- 要删除一个文件目录,请注意该文件目录内不能包含文件或者文件目录
磁盘中是否存在真正的文件或目录对File类对象影响:
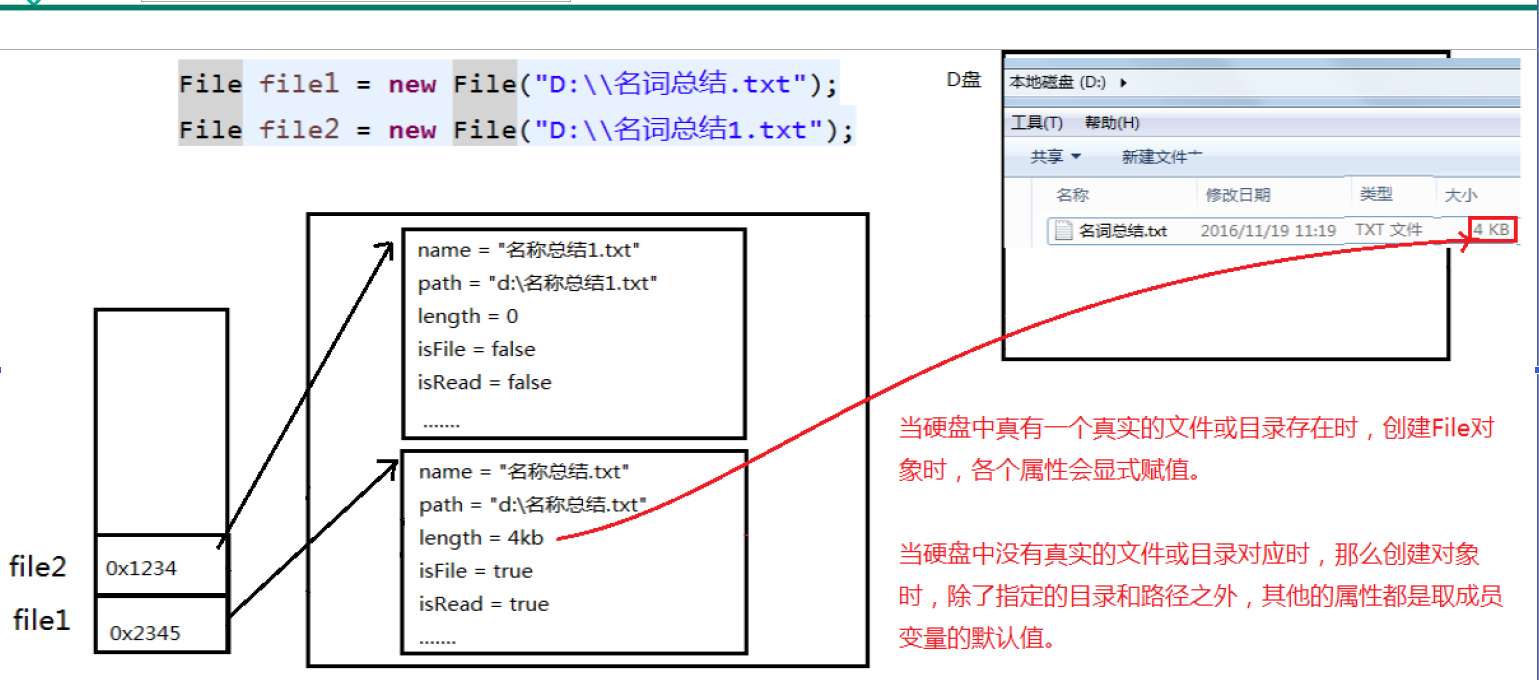
- 当硬盘中真有一个真实的文件或目录存在时,创建File对象时,各个属性会显式赋值。
- 当硬盘中没有真实的文件或目录对应时,那么创建对象时,除了指定的目录和路径之外,其他的属性都是取成员变量的默认值。
(三)、总结
File类中涉及到关于文件或文件目录的创建、删除、重命名、修改时间、文件大小等方法,并未涉及到写入或读取文件内容的操作。如果需要读取或写入文件内容,必须使用IO流来完成。
后续File类的对象常会作为参数传递到流的构造器中,指明读取或写入的“终点”
IDEA中,如开发中在JUnit中的单元测试方法测试File类,则相对路径即为当前Module下。如在main()方法测试File类,则相对路径即为当前的Project下
Eclipse中,无论在单元测试方法还是在main()测试File类,相对路径都是当前的Project下
二、IO流原理及流的分类
(一)、Java IO原理
- I/O是Input/Output的缩写, I/O技术是非常实用的技术,用于处理设备之间的数据传输。如读/写文件,网络通讯等。
- Java程序中,对于数据的输入/输出操作以“流(stream)” 的方式进行。
- java.io包下提供了各种“流”类和接口,用以获取不同种类的数据,并通过标准的方法输入或输出数据。
IO不止读写文件,还可在多个设备之间进行网络通信;
java提供的各种流类和流接口很多,但都是通过标准的方法实现输入输出,即读取数据一般是采用read()、写入数据一般采用write(),只是方法的参数不同。
- 输入input:读取外部数据(磁盘、光盘等存储设备的数据)到程序(内存)中。
- 输出output:将程序(内存)数据输出到磁盘、光盘等存储设备中。
- Java中的IO是站位在程序或内存角度的输入(数据流向内存)、输出(数据从内存输出)
(二)、流的分类
- 按操作数据单位不同分为:字节流(8 bit),字符流(16 bit)
- 字符流(char类型占用2个字节)更适合处理文本文件
- 字节流适合处理图片、视频等非文本数据
- 按数据流的流向不同分为:输入流,输出流
- 按流的角色的不同分为:节点流,处理流
- 节点流:直接作用在文件上的流
- 处理流:在已有流的基础上再加一层流(将原来的流作为新添加流的构造器参数)。目的是提高传输速度
先判断流向:分为输入、输出流
再判断数据单位:分为字节流、字符流
最后判断角色:分为节点流、处理流
(三)、IO流体系
- IO流中的4个抽象基类

IO流分类(蓝框的流类需要重点掌握)
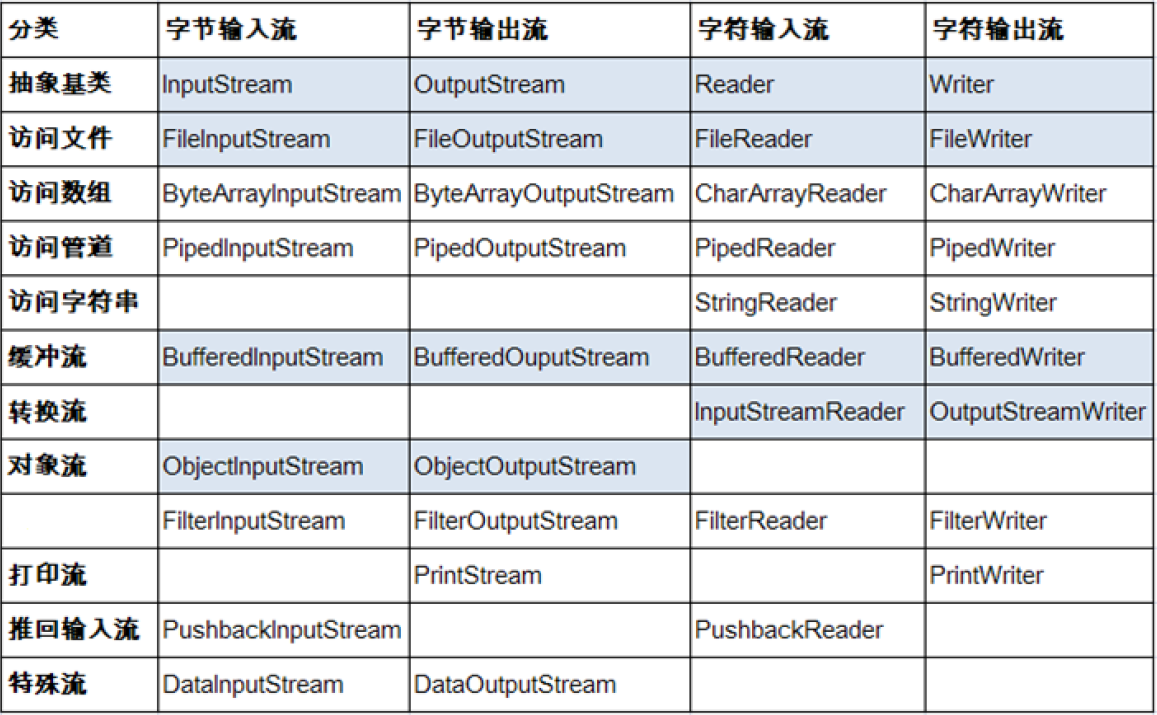
- 访问文件的4个流类:节点流;其他流为处理流
需掌握的IO流的体系结构
抽象基类 InputStream OutputStream Reader Writer 节点流 FileInputStream
( read(byte[] buffer) )FileOutputStream
( write(byte[] buffer, offset, len) )FileReader
( read(char[] cbuf) )FileWriter
( write(char[] cbuf, offset, len) )缓冲流 BufferedInputStream
( read(byte[] buffer) )BufferedOutputStream
( write(byte[] buffer, offset, len) / flush() )BufferedReader
( read(char[] cbuf); readLine() )BufferedWriter
( write(char[] cbuf, offset, len) / flush())
(四)、输入输出的标准化过程
- 输入过程
- 创建File类对象,指明读取的数据的来源(要求此文件一定要存在)
- 创建相应的输入流,将File类的对象作为参数,传入流的构造器中
- 具体的读入过程:
- 创建相应的byte[] 或 char[]
- 使用循环实现读入
- 关闭流资源
- 输出过程
- 创建File类对象,指明写出数据的位置(不要求此文件一定存在)
- 创建相应的输出流,将File类的对象作为参数,传入流的构造器中
- 具体的写出过程
- write(byte[]/char[] buffer, offset, len)
- 关闭流资源
三、节点流(或文件流)
(一)、FileReader
1
2
3
4
5
6
7
8
9
10
11
12
13
14
15
16
17
18
19
20
21
22
23
24
25
26
27
28
29
30
31
32
33
// 将IO module下的hello.txt文件读入程序并输出至控制台
public void testFileReaderWriter(){
FileReader fileReader = null;
try {
// 1. 实例化File类的对象,指明操作的文件
File file = new File("hello.txt"); //相对路径为当前module;main中的相对路径为当前project
// 2.提供具体的流
fileReader = new FileReader(file);
// 3. 数据读入
// read(): 返回读入的一个字符。如果到达文件末尾返回-1
int read = fileReader.read();
while (read != -1){
System.out.print((char)read);
read = fileReader.read();
}
} catch (IOException e) {
e.printStackTrace();
} finally {
// 4. 流的关闭操作
// JVM的垃圾回收 对于物理连接如数据库连接、输入输出流、Socket连接无能为力
// 因此,流需要手动关闭。且要保证fileReader对象不能是null
if(fileReader != null) {
try {
fileReader.close();
} catch (IOException e) {
e.printStackTrace();
}
}
}
}使用read(char[] cbuf):
1
2
3
4
5
6
7
8
9
10
11
12
13
14
15
16
17
18
19
20
21
22
23
24
25
26
27
28
public void testFileReaderWriter2(){
FileReader fileReader = null;
try {
// 1. 实例化File类
File file = new File("hello.txt");
// 2. 实例化流
fileReader = new FileReader(file);
// 3. 读取或写入操作
char[] cbuf = new char[5];
int len;
while ((len = fileReader.read(cbuf)) != -1){
// 返回每次读入cbuf数组中的字符个数,如果达到文件末尾则返回-1
String str = new String(cbuf, 0, len);
System.out.print(str);
}
} catch (IOException e) {
e.printStackTrace();
} finally {
if(fileReader != null) {
try {
fileReader.close();
} catch (IOException e) {
e.printStackTrace();
}
}
}
}
方法使用:
方法一
1
int read(): 返回读入的一个字符。如果到达文件末尾返回-1
方法二
1
read(char[] cbuf): 返回每次读入cbuf数组中的字符个数,如果达到文件末尾则返回-1
操作过程:
- File类实例化
- 流的实例化
- 读入或写出操作
- 资源关闭
注意
- 对于流中的异常处理:最好使用try-catch-finally处理异常,保证流是一定可以执行关闭操作的(防止出现内存泄漏)
- 注意流需要手动关闭,在调用关闭方法前还需判断流不是null
- 读入的文件一定要存在,否则会报FileNotFoundException
(二)、FileWriter
1 |
|
- 注意:
- 输出操作,对应的File可以不存在,并不会报异常
- File对应的硬盘中文件如果不存在,在输出过程中,会自动创建此文件
- File对应的硬盘中文件如果存在:
- 如果流使用的构造器为:FileWriter(file, false) 或 FileWriter(file),则会在执行write()方法对文件进行写入操作后执行对原有文件的覆盖写入操作
- 如果流使用的构造器为:FileWriter(file, true),则在执行write()方法对文件进行写入操作后不会对原有文件进行覆盖写入操作,而是在原有文件内容基础上继续追加
- FileReader和FileWriter不能处理图片等非文本数据的处理
- 输出操作,对应的File可以不存在,并不会报异常
(三)、FileInputStream & FileOutputStream
FileReader和FileWriter不能处理图片等非文本数据的处理。处理非文本数据时需使用字节流
- 对于文本文件(.txt, .java, .c, .cpp):使用字符流处理。
- 对于非文本文件(图片、视频、音频、文档.doc .ppt):使用字节流处理
1 |
|
四、缓冲流(处理流的一种)
- 缓冲流
- BufferedInputStream
- BufferedOutputStream
- BufferedReader
- BufferedWriter
- 作用:提高文件的读写效率;一般开发时不用节点流(文件流),一般使用效率更高的缓冲流
- 原因:内部提供了缓冲区,默认大小为8kB
- bufferedOutputStream.flush()方法:刷新缓存区(即清空缓存区,不管是不是已经存满了缓冲区都把缓冲区内的数据写出去)
- 处理流,就是”套接在“已有的流的基础上
(一)、BufferedInputStream & BufferedOutputStream
实现非文本文件的复制
1 |
|
(二)、BufferedWriter & BufferedReader
实现文本文件的复制
1 |
|
练习
图片的加密及解密
1 | // 图片加密 |
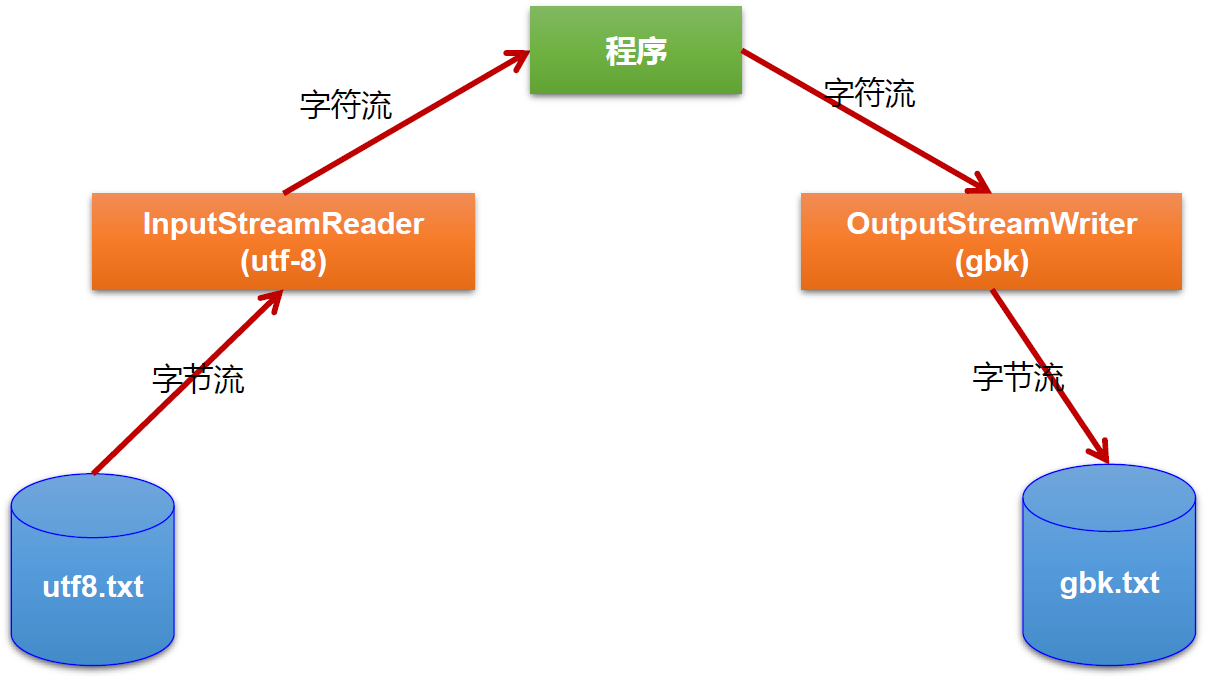
五、转换流(处理流的一种)
转换流(属于字符流):
- InputStreamReader:将一个字节的输入流转换为字符的输入流
- OutputStreamWriter:将一个字符的输出流转换为字节的输出流
转换流作用:处理字节流和字符流之间的转换
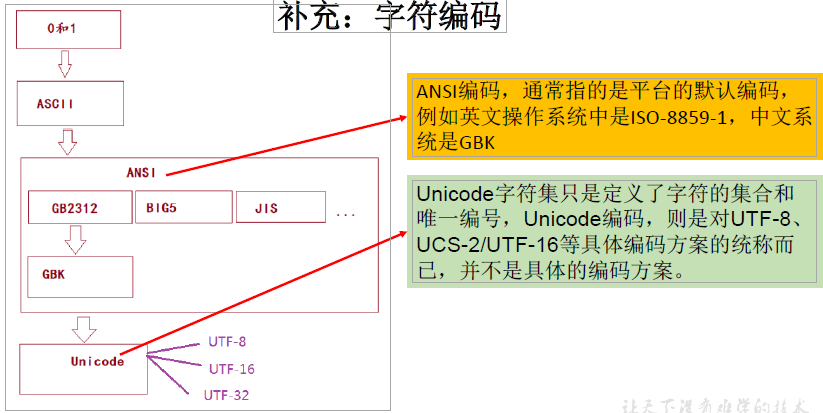
字符集:
- ASCII:美国标准信息交换码。 用一个字节的7位可以表示。
- ISO8859-1:拉丁码表。欧洲码表 用一个字节的8位表示。
- GB2312:中国的中文编码表。最多两个字节编码所有字符
- GBK:中国的中文编码表升级,融合了更多的中文文字符号。最多两个字节编码
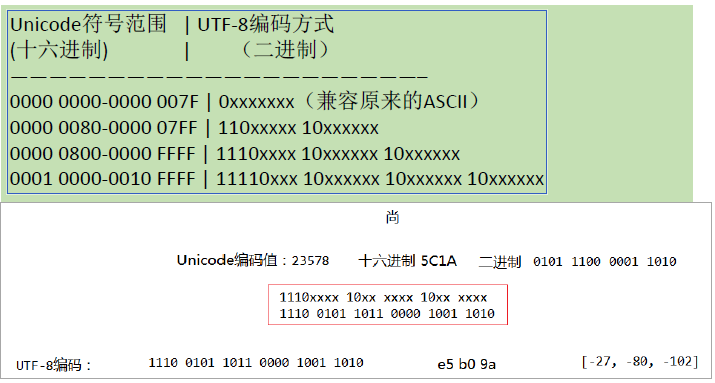
- Unicode:国际标准码,融合了目前人类使用的所有字符。为每个字符分配唯一的字符码。所有的文字都用两个字节来表示。
- UTF-8:变长的编码方式,可用1-4个字节来表示一个字符。
字符集Unicode历史
- Unicode不完美,这里就有三个问题,一个是,我们已经知道,英文字母只用一个字节表示就够了,第二个问题是如何才能区别Unicode和ASCII?计算机怎么知道两个字节表示一个符号,而不是分别表示两个符号呢?第三个,如果和GBK等双字节编码方式一样,用最高位是1或0表示两个字节和一个字节,就少了很多值无法用于表示字符,不够表示所有字符。Unicode在很长一段时间内无法推广,直到互联网的出现。
- 面向传输的众多 UTF(UCS Transfer Format)标准出现了,顾名思义,UTF-8就是每次8个位传输数据,而UTF-16就是每次16个位。这是为传输而设计的编码,并使编码无国界,这样就可以显示全世界上所有文化的字符了。
- Unicode只是定义了一个庞大的、全球通用的字符集,并为每个字符规定了唯一确定的编号,具体存储成什么样的字节流,取决于字符编码方案。推荐的Unicode编码是UTF-8和UTF-16。
1 | InputStreamReader(FileInputStream, String charset); //参数2具体使用哪个字符集,取决于文件保存时使用的字符集;实现解码操作 |
- 对后面学习的启示
- 客户端/浏览器段 <----> 后端(java, GO, Python, Node.js, php) <---> 数据库
- 要求前前后后使用的字符集都要统一:UTF-8
六、标准输入、输出流(了解)
- System.in和System.out分别代表了系统标准的输入和输出设备 默认输入设备是:键盘,输出设备是:显示器
- System.in的类型是InputStream
- System.out的类型是PrintStream,其是OutputStream的子类FilterOutputStream 的子类
重定向:通过System类的setIn,setOut方法对默认设备进行改变。
public static void setIn(InputStream in)
public static void setOut(PrintStream out)
从键盘输入字符串,要求将读取到的整行字符串转成大写输出。然后继续进行输入操作,直至当输入“e”或者“exit”时,退出程序。
- 方法一:使用Scanner实现,调用next()返回一个字符串
- 方法二:使用System.in实现
Create a program named MyInput.java: Contain the methods for reading int, double, float, boolean, short, byte and String values from the keyboard.
七、打印流(了解)
- 打印流:
- printStream
- printWriter
- 作用:实现将基本数据类型的数据格式转化为字符串输出(调用的print(int / float / ...)或println(int / float / ...)等方法都是将各类型数据转换为String在输出到输出设备)
- 和System.setOut()配合使用
八、数据流(了解)
- 数据流:
- DataInputStream:将文件中存储的基本数据类型变量和字符串读取到内存中,保存在变量中
- 读取不同类型的数据的顺序要与当初写入文件时保存的数据顺序一致
- DataOutputStream:将内存中的基本数据类型变量或字符串写入到文件中
- DataInputStream:将文件中存储的基本数据类型变量和字符串读取到内存中,保存在变量中
- 用于读取或写出基本数据类型的变量或字符串
- 为了方便地操作Java语言的基本数据类型和String的数据,可以使用数据流。
- 数据流有两个类:(用于读取和写出基本数据类型、String类的数据)
- DataInputStream 和 DataOutputStream
- 分别“套接”在 InputStream 和 OutputStream 子类的流上
- DataInputStream中的常用方法
- DataInputStream中的方法boolean readBoolean()
- char readChar()
- double readDouble()
- long readLong()
- String readUTF()
- DataOutputStream中的方法
- byte readByte()
- float readFloat()
- short readShort()
- int readInt()
- void readFully(byte[] b)
- DataOutputStream
- 将上述的方法的read改为相应的write即可。
九、对象流(掌握)
数据流只能用于基本数据类型或字符串的读取或写入,不能实现对象的读取或写入。
(一)、对象流概念
对象流
- ObjectInputStream:内存中的对象 --> 存储中的文件、通过网络传输出去
- OjbectOutputSteam:存储中的文件、通过网络接收过理 --> 内存中的对象
作用:用于存储和读取基本数据类型数据或对象的处理流。它的强大之处就是可以把Java中的对象写入到数据源中,也能把对象从数据源中还原回来。
序列化和反序列化:
- 序列化:用ObjectOutputStream类保存基本类型数据或对象的机制
- 反序列化:用ObjectInputStream类读取基本类型数据或对象的机制
- ObjectOutputStream和ObjectInputStream不能序列化static和transient修饰的成员变量
(二)、对象的序列化(对象流重心,重点为对象序列化机制)
- 序列化和反序列化:要求操作对象所属的类是可序列化、可反序列化的。【对象序列化机制】
- 对象序列化机制允许把内存中的Java对象转换成平台无关的二进制流,从而允许把这种二进制流持久地保存在磁盘上,或通过网络将这种二进制流传输到另一个网络节点(序列化)。//当其它程序获取了这种二进制流,就可以恢复成原来的Java对象(反序列化)【能用自己的话表述】
- 序列化过程:将内存中的java对象保存到磁盘中或通过网络传输出去;使用ObjectOutputStream实现
- 调用writeObject()方法后,再显式调用flush()刷新
- 反序列化过程:将磁盘文件中的对象还原为内存中的对象;使用ObjectInputStream实现
- 序列化过程:将内存中的java对象保存到磁盘中或通过网络传输出去;使用ObjectOutputStream实现
- 序列化的好处在于可将任何实现了Serializable接口的对象转化为字节数据,使其在保存和传输时可被还原
- 序列化是 RMI(Remote Method Invoke – 远程方法调用)过程的参数和返回值都必须实现的机制,而 RMI 是 JavaEE 的基础。因此序列化机制是JavaEE平台的基础
- 一般开发中会将各种类型的需要序列化的对象转化为String类型(即json文件类型),原因是String实现了序列化。
(三)、自定义类的序列化
如果需要让某个对象支持序列化机制,则必须让对象所属的类及其属性是可序列化的,为了让某个类是可序列化的,该类必须实现如下两个接口之一。否则,会抛出NotSerializableException异常
- Serializable
- Externalizable
自定义类需要满足如下要求,方可序列化
- 需要实现接口:Serializable
- 给该类提供一个全局常量:serialVersionUID
- 用以唯一标识某个类
- 除了当前操作对象所属类需要实现Serializable接口之外,还必须保证其内部所有属性也必须是可序列化的
- 实际上当对象用到了内部自定义的其他属性时,才需将该属性所属类实现序列化接口,但为了程序健壮性要求属性所属自定义类都需实现Serializable接口
- 默认情况下,基本数据类型是可序列化的
补充:
- ObjectOutputStream和ObjectInputStream不能序列化static和transient修饰的成员变量
- static的属性或其他成员属于类,而不属于对象,因此序列化对象时不能序列化static的成员变量。
- transient为不允许序列化的关键字,加上此关键字的成员变量无法被序列化
- 成员变量使用static / transient的对象序列化可以成功,但无法把static / transient成员变量写入文件或发送至网络,反序列化时的static / transient成员变量值为所属类的默认值
- ObjectOutputStream和ObjectInputStream不能序列化static和transient修饰的成员变量
使自定义Person类支持序列化机制
1
2
3
4
5
6
7
8
9
10
11
12
13
14
15
16
17
18
19
20
21
22
23
24
25
26
27
28
29
30
31
32
33
34
35
36
37
38
39
40
41
42
43
44
45
46
47
48
49
50
51
52
53
54
55
56public class Person implements Serializable {
public static final long serialVersionUID = 464135431543544L;
private String name;
private int age;
public Person() {
}
public Person(String name, int age) {
this.name = name;
this.age = age;
}
public String getName() {
return name;
}
public void setName(String name) {
this.name = name;
}
public int getAge() {
return age;
}
public void setAge(int age) {
this.age = age;
}
public boolean equals(Object o) {
if (this == o) return true;
if (o == null || getClass() != o.getClass()) return false;
Person person = (Person) o;
if (age != person.age) return false;
return name != null ? name.equals(person.name) : person.name == null;
}
public int hashCode() {
int result = name != null ? name.hashCode() : 0;
result = 31 * result + age;
return result;
}
public String toString() {
return "Person{" +
"name='" + name + '\'' +
", age=" + age +
'}';
}
}Person的序列化过程
1
2
3
4
5
6
7
8
9
10
11
12
13
14
15
16
17
18
19
20
21
22
23
public void testSerializable(){
ObjectOutputStream oos = null;
try {
// 1. & 2.
oos = new ObjectOutputStream(new FileOutputStream("Person_Object.dat"));
// 3.
oos.writeObject(new Person("Tom", 23));
oos.flush(); // 显式调用flush
} catch (IOException e) {
e.printStackTrace();
} finally {
if(oos != null){
// 4.
try {
oos.close();
} catch (IOException e) {
e.printStackTrace();
}
}
}
}Person的反序列化过程
1
2
3
4
5
6
7
8
9
10
11
12
13
14
15
16
17
18
19
20
21
22
23
24
25
26
public void antiSerializeTest(){
ObjectInputStream ois = null;
try {
// 1. & 2.
ois = new ObjectInputStream(new FileInputStream("Person_Object.dat"));
// 3.
Object obj = ois.readObject();
Person p = (Person) obj;
System.out.println(p);
} catch (IOException e) {
e.printStackTrace();
} catch (ClassNotFoundException e) {
e.printStackTrace();
} finally {
if(ois != null){
// 4.
try {
ois.close();
} catch (IOException e) {
e.printStackTrace();
}
}
}
}
(四)、serialVerionUID
- serialVersionUID用来表明类的不同版本间的兼容性。简言之,其目的是以序列化对象进行版本控制,有关各版本反序列化时是否兼容。
- 如果类没有显示定义这个静态常量,它的值是Java运行时环境根据类的内部细节自动生成的。若类的实例变量做了修改,serialVersionUID 可能发生变化,序列化和反序列化容易出错。故建议,显式声明。
- 使用默认serialVersionUID时,若序列化后对类进行了更改,则反序列化时会出现异常,因此需要显式声明serialVersionUID
十、随机存取文件流(了解)
(一)、RandomAccessFile 类
- RandomAccessFile区别于其他流
- 声明在java.io包下,但直接继承于java.lang.Object类。
- 并且它实现了DataInput、DataOutput这两个接口,也就意味着这个类既可以读也可以写。
- RandomAccessFile 类支持 “随机访问” 的方式,程序可以直接跳到文件的任意地方来读、写文件
- 支持只访问文件的部分内容
- 可以向已存在的文件后追加内容
(二)、构造器
构造器
- public RandomAccessFile(File file, String mode)
- public RandomAccessFile(String name, String mode)
mode参数
创建 RandomAccessFile 类实例需要指定一个 mode 参数,该参数指定 RandomAccessFile 的访问模式:
- r: 以只读方式打开
- rw:打开以便读取和写入
- rwd:打开以便读取和写入;同步文件内容的更新
- rws:打开以便读取和写入;同步文件内容和元数据的更新
JDK1.6中写道:每次write数据时,"rw"模式下数据不会立即写入到硬盘中;而"rwd"下数据会被立即写入到硬盘中。如果写数据发生异常,"rwd"模式中已被write的数据被保存至硬盘,而"rw"则全部丢失
如果模式为只读r。则不会创建文件,而是会去读取一个已经存在的文件,如果读取的文件不存在则会出现异常。
如果模式为rw读写。如果文件不存在则会去创建文件,如果存在则不会创建。
实现文件内容的复制
1
2
3
4
5
6
7
8
9
10
11
12
13
14
15
16
17
18
19
20
21
22
23
24
25
26
27
28
29
30
31
32
33
public void test(){
RandomAccessFile randomAccessFile = null;
RandomAccessFile randomAccessFile2 = null;
try {
randomAccessFile = new RandomAccessFile("GenshinImpact.png","r");
randomAccessFile2 = new RandomAccessFile("GenshinImpact-access.png","rw");
byte[] buffer = new byte[1024];
int len;
while ((len = randomAccessFile.read(buffer)) != -1){
randomAccessFile2.write(buffer, 0, len);
}
} catch (IOException e) {
e.printStackTrace();
} finally {
if(randomAccessFile != null){
try {
randomAccessFile.close();
} catch (IOException e) {
e.printStackTrace();
}
}
if(randomAccessFile2 != null){
try {
randomAccessFile2.close();
} catch (IOException e) {
e.printStackTrace();
}
}
}
}
(三)、RandomAccessFile类的使用
输出流
- 如果RandomAccessFile作为输出流时,写入到的文件若不存在,则执行过程中自动创建
- 如果写出的文件存在,则会对原有内容依次向后覆盖,且从头开始覆盖,并不会一次全部覆盖。
输出内容至指定位置
- RandomAccessFile 对象包含一个记录指针,用以标示当前读写处的位置。 RandomAccessFile 类对象可以自由移动记录指针:
- long getFilePointer():获取文件记录指针的当前位置
- void seek(long pos):将文件记录指针定位到 pos 位置
- 调用write后输出的内容将在指定位置覆盖指定位置后面的内容,若要实现插入内容,则需要将指定位置至文件结尾的全部内容读出,再将需要插入的内容写入文件,最后再将刚刚读出的内容写入。
1
2
3
4
5
6
7
8
9
10
11
12
13
14
15
16
17
18
19
20
21
22
23
24
25
26
27
28
29
30
31
// 在hello.txt的第三个位置插入内容
public void testRandomAccessFileInsert(){
RandomAccessFile randomAccessFile = null;
try {
randomAccessFile = new RandomAccessFile("hello.txt", "rw");
randomAccessFile.seek(3); // 将指针指向角标为3的位置
byte[] buffer = new byte[1024];
// 将数据保存至StringBuilder
StringBuilder builder = new StringBuilder();
int len;
while ((len = randomAccessFile.read(buffer)) != -1){
builder.append(new String(buffer, 0, len)); // 需要指定长度,否则会把整个byte数组添加到builder
}
randomAccessFile.seek(3);
randomAccessFile.write("xyz".getBytes()); // 字符串转换为byte数组
randomAccessFile.write(builder.toString().getBytes());
} catch (IOException e) {
e.printStackTrace();
} finally {
if (randomAccessFile != null){
try {
randomAccessFile.close();
} catch (IOException e) {
e.printStackTrace();
}
}
}
}- RandomAccessFile 对象包含一个记录指针,用以标示当前读写处的位置。 RandomAccessFile 类对象可以自由移动记录指针:
我们可以用RandomAccessFile这个类,来实现一个多线程断点下载的功能,用过下载工具的朋友们都知道,下载前都会建立两个临时文件,一个是与被下载文件大小相同的空文件,另一个是记录文件指针的位置文件,每次暂停的时候,都会保存上一次的指针,然后断点下载的时候,会继续从上一次的地方下载,从而实现断点下载或上传的功能,有兴趣的朋友们可以自己实现下。
十一、NIO.2中Path、Paths、 Files类的使用(了解)
(一)、NIO / NIO.2
Java NIO (New IO,Non-Blocking IO)是从Java 1.4版本开始引入的一套新的IO API,可以替代标准的Java IO API。NIO与原来的IO有同样的作用和目的,但是使用的方式完全不同,NIO支持面向缓冲区的(IO是面向流的)、基于通道的IO操作。NIO将以更加高效的方式进行文件的读写操作。【前面的流都是阻塞IO】
随着 JDK 7 的发布,Java对NIO进行了极大的扩展,增强了对文件处理和文件系统特性的支持,以至于我们称他们为 NIO.2。因为 NIO 提供的一些功能,NIO已经成为文件处理中越来越重要的部分。
Java API中提供了两套NIO,一套是针对标准输入输出NIO,另一套就是网络编程NIO。
|——java.nio.channels.Channel
  |——FileChannel:处理本地文件

  |——SocketChannel:TCP网络编程的客户端的Channel

  |——ServerSocketChannel:TCP网络编程的服务器端的Channel

  |——DatagramChannel:UDP网络编程中发送端和接收端的Channel
(二)、Path、Paths和Files
3个类声明在java.nio.file包下
早期的Java只提供了一个File类来访问文件系统,但File类的功能比较有限,所提供的方法性能也不高。而且,大多数方法在出错时仅返回失败,并不会提供异常信息。
NIO. 2为了弥补这种不足,引入了Path接口,代表一个平台无关的平台路径,描述了目录结构中文件的位置。Path可以看成是File类的升级版本,实际引用的资源也可以不存在。【即可用Path替换File】
1
2
3
4
5
6
7
8
9
10
11
12
13
Path 常用方法:
String toString() //: 返回调用 Path 对象的字符串表示形式
boolean startsWith(String path)// : 判断是否以 path 路径开始
boolean endsWith(String path)// : 判断是否以 path 路径结束
boolean isAbsolute()// : 判断是否是绝对路径
Path getParent()// :返回Path对象包含整个路径,不包含 Path 对象指定的文件路径
Path getRoot()// :返回调用 Path 对象的根路径
Path getFileName()// : 返回与调用 Path 对象关联的文件名
int getNameCount()// : 返回Path 根目录后面元素的数量
Path getName(int idx)// : 返回指定索引位置 idx 的路径名称
Path toAbsolutePath()// : 作为绝对路径返回调用 Path 对象
Path resolve(Path p)// :合并两个路径,返回合并后的路径对应的Path对象
File toFile()//: 将Path转化为File类的对象同时,NIO.2在java.nio.file包下还提供了Files、Paths工具类,
Files包含了大量静态的工具方法来操作文件;
1
2
3
4
5
6
7
8
9
10
11
12
13
14
15
16
17
18
19
20
21
22
23
java.nio.file.Files 用于操作文件或目录的工具类。
Files常用方法:
Path copy(Path src, Path dest, CopyOption … how)// : 文件的复制
Path createDirectory(Path path, FileAttribute<?> … attr)// : 创建一个目录
Path createFile(Path path, FileAttribute<?> … arr)// : 创建一个文件
void delete(Path path)// : 删除一个文件/目录,如果不存在,执行报错
void deleteIfExists(Path path)// : Path对应的文件/目录如果存在,执行删除
Path move(Path src, Path dest, CopyOption…how)// : 将 src 移动到 dest 位置
long size(Path path)// : 返回 path 指定文件的大小
Files常用方法:用于判断
boolean exists(Path path, LinkOption … opts)// : 判断文件是否存在
boolean isDirectory(Path path, LinkOption … opts)// : 判断是否是目录
boolean isRegularFile(Path path, LinkOption … opts)// : 判断是否是文件
boolean isHidden(Path path)// : 判断是否是隐藏文件
boolean isReadable(Path path)// : 判断文件是否可读
boolean isWritable(Path path)// : 判断文件是否可写
boolean notExists(Path path, LinkOption … opts)// : 判断文件是否不存在
Files常用方法:用于操作内容
SeekableByteChannel newByteChannel(Path path, OpenOption…how)// : 获取与指定文件的连接,how 指定打开方式。
DirectoryStream<Path> newDirectoryStream(Path path)// : 打开 path 指定的目录
InputStream newInputStream(Path path, OpenOption…how)//:获取InputStream 对象
OutputStream newOutputStream(Path path, OpenOption…how)// : 获取 OutputStream 对象Paths则包含了两个返回Path的静态工厂方法。Paths 类提供的静态 get() 方法用来获取 Path 对象:
- static Path get(String first, String … more) : 用于将多个字符串串连成路径
- static Path get(URI uri): 返回指定uri对应的Path路径
补充(第三方API jar包导入)
若要导入到当前Module下
- 在Module上右键 --> New Directory --> 第三方jar包一般都放在lib中
- 将jar包复制粘贴进lib目录下,此时的jar包还无法使用
- 右键jar包,选择Add as Library,选择OK,此时既可使用jar包下的API
一般开发中无需自己写IO流实现功能,而是有相应的jar包或API直接调用即可。
每日一考
如何遍历Map的key集、value集、key-value集,使用上泛型
写出使用Iterator和增强for循环遍历List
的代码,使用上泛型 提供一个方法,用于遍历获取HashMap<String, String>中的所有value,并存放在List中返回。考虑上集合中泛型的使用。
创建一个与a.txt文件同目录下的另外一个文件b.txt
Map接口中的常用方法有哪些?
说明流的三种分类方式
写出4个IO流中的抽象基类、4个文件流、4个缓冲流
字节流与字符流的区别与使用情景
字节流针对处理非文本文件,字符流针对处理文本文件
字节流:read(byte[] buffer) / byte read()
字符流:read(char[] cbuf) / char read()
使用缓冲流实现a.jpg文件复制为b.jpg文件的操作
转换流是那两个类,分别的作用是什么?请分别创建两个类的对象。